 vafadarnia

This weekend, I had some time to kill, so I decided to train an AI to rate how good a UI looks.
Of course, you can already give a screenshot to a multimodal LLM and ask it for a rating. But there were a couple of things I wanted to do differently.
First, costs are a thing. I wanted something I could run locally and keep using without paying for every single screenshot.
Second, I’m not so sure about the ratings multimodal LLMs give. From my experience, they have a habit of landing on 7/10 no matter what you show them. I wanted something that would learn what the whole scale means to me, including the designs I’d give an absolute 0 or an absolute 10.
Asking an LLM to compare two UIs works better in my experience, but that’s another experiment.
For this one, I wanted to see whether a model could pick up my taste from examples.
So I put together a small Python project called WebTaste.
Finding something to rate
For starters, I needed a dataset.
I couldn’t find anything suitable. And even if I found a bunch of screenshots with design ratings attached, those would be someone else’s ratings. I’d still have to go through them myself.
I used Tranco, a website popularity list, to get the domains. Then I wrote a script using Playwright and Chromium to visit their homepages and take screenshots at 1440 × 900.
I chose landing pages because, well, they were the easiest thing to do. Every domain gives me somewhere obvious to start, and capturing the first screen keeps things simple enough.
Maybe later I’ll add other pages. For now, I just wanted to rate what I see when I open a website.
Of course the capture script has concurrency and resumes where it left off. Gathering the images was fairly straightforward.
Getting useful images was a little messier. Some sites showed login pages, some didn’t load properly, and some had a cookie banner covering half the screen.
For those, I rated whatever UI was actually in focus. A login page is still a UI. So is a cookie dialog, unfortunately.
Broken-looking pages, server errors, and other unpleasant stuff that made it into the captures got a 0. So the bottom of the scale includes both designs I dislike and pages that are visibly broken. That’s part of what the model gets to learn.
Building the rating tool
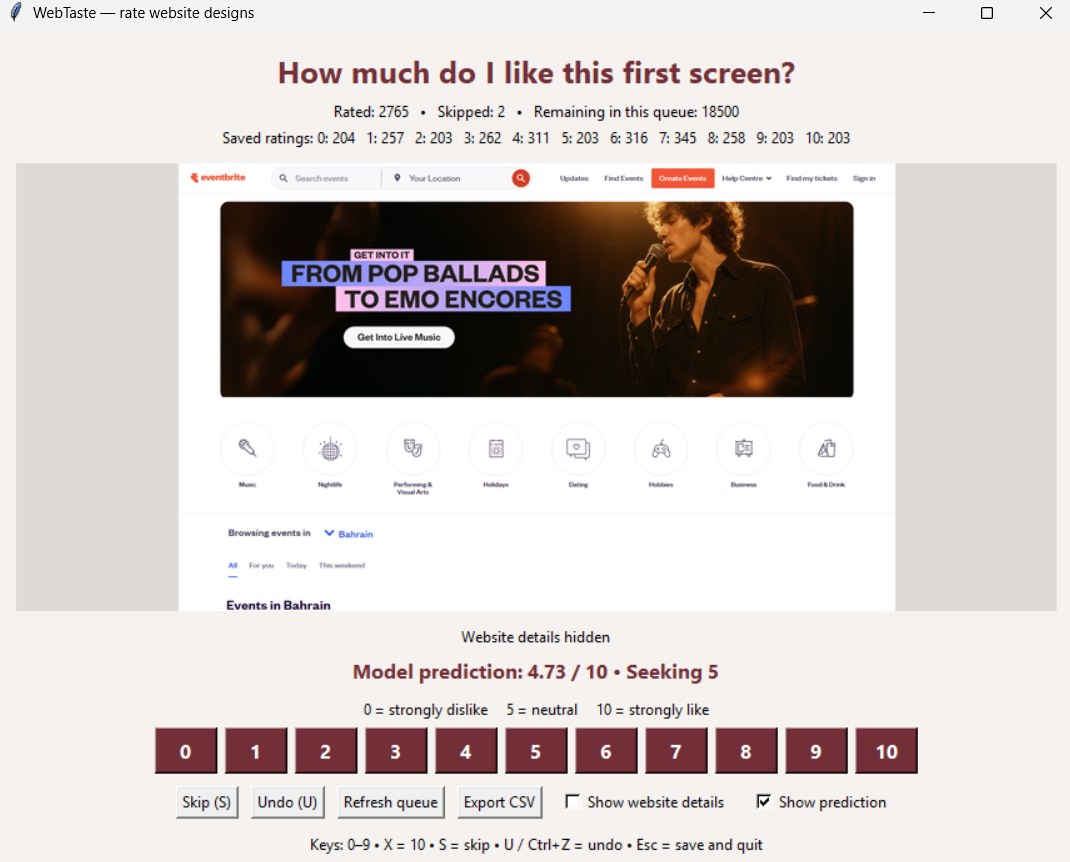
The rating tool is pretty basic. It shows a screenshot and asks me to rate it from 0 to 10.
That’s pretty much it. Ofc it has keyboard shortcuts too.
I initially added an option to hide the website name and page title, but ended up not using it. I kept stumbling upon interesting websites and wanting to check them out.
This is a damn big world we live in. So many projects out there, actually running in production. It’s insane.
Anyway...
Ratings go into SQLite, and the images get copied into folders named after their scores. The database keeps track of everything, and the folders make it easy to browse the images manually.
I ended up with 2,765 manually rated screenshots for this run.
The tools took about 1.5 hours with Codex, using GPT-6.1 Sol. Rating the images took about five hours.
So yeah, clicking numbers took considerably longer than building the thing.
What actually gets trained?
I used a pretrained vision model to extract features from the screenshots.
The first version used CLIP ViT-B/32. Once I had the image features cached, training the scoring models only took seconds. So I decided to try a larger encoder and switched to SigLIP 2 SO400M at 384px, using OpenCLIP.
The encoder takes a screenshot and turns it into an embedding. Basically, a vector of numbers representing features of the image.
I keep the encoder frozen and train a much smaller model to turn those numbers into my rating.
There was one detail I had to account for: the screenshots are wide, but the encoder expects a square image. I pad them to a square before resizing, so the whole page stays visible.
Cropping could chop off the navigation, a sidebar, or some whitespace that affects how the page looks. Resizing still loses detail, though. Small text and subtle differences in typography are harder to keep.
Of course I cached the embeddings. Recomputing them every time I changed a rating or reran training would get old quickly.
My RTX 3080 handles extracting the image features. The small scoring models train on the CPU.
The saved scoring bundle ended up being only about 1.1 MB, since the big pretrained encoder is loaded separately.
This is a frozen encoder with a regression head. It isn’t LoRA: the extra scoring model sits after the encoder, rather than adding trainable updates inside it.
Using the model to help build the dataset
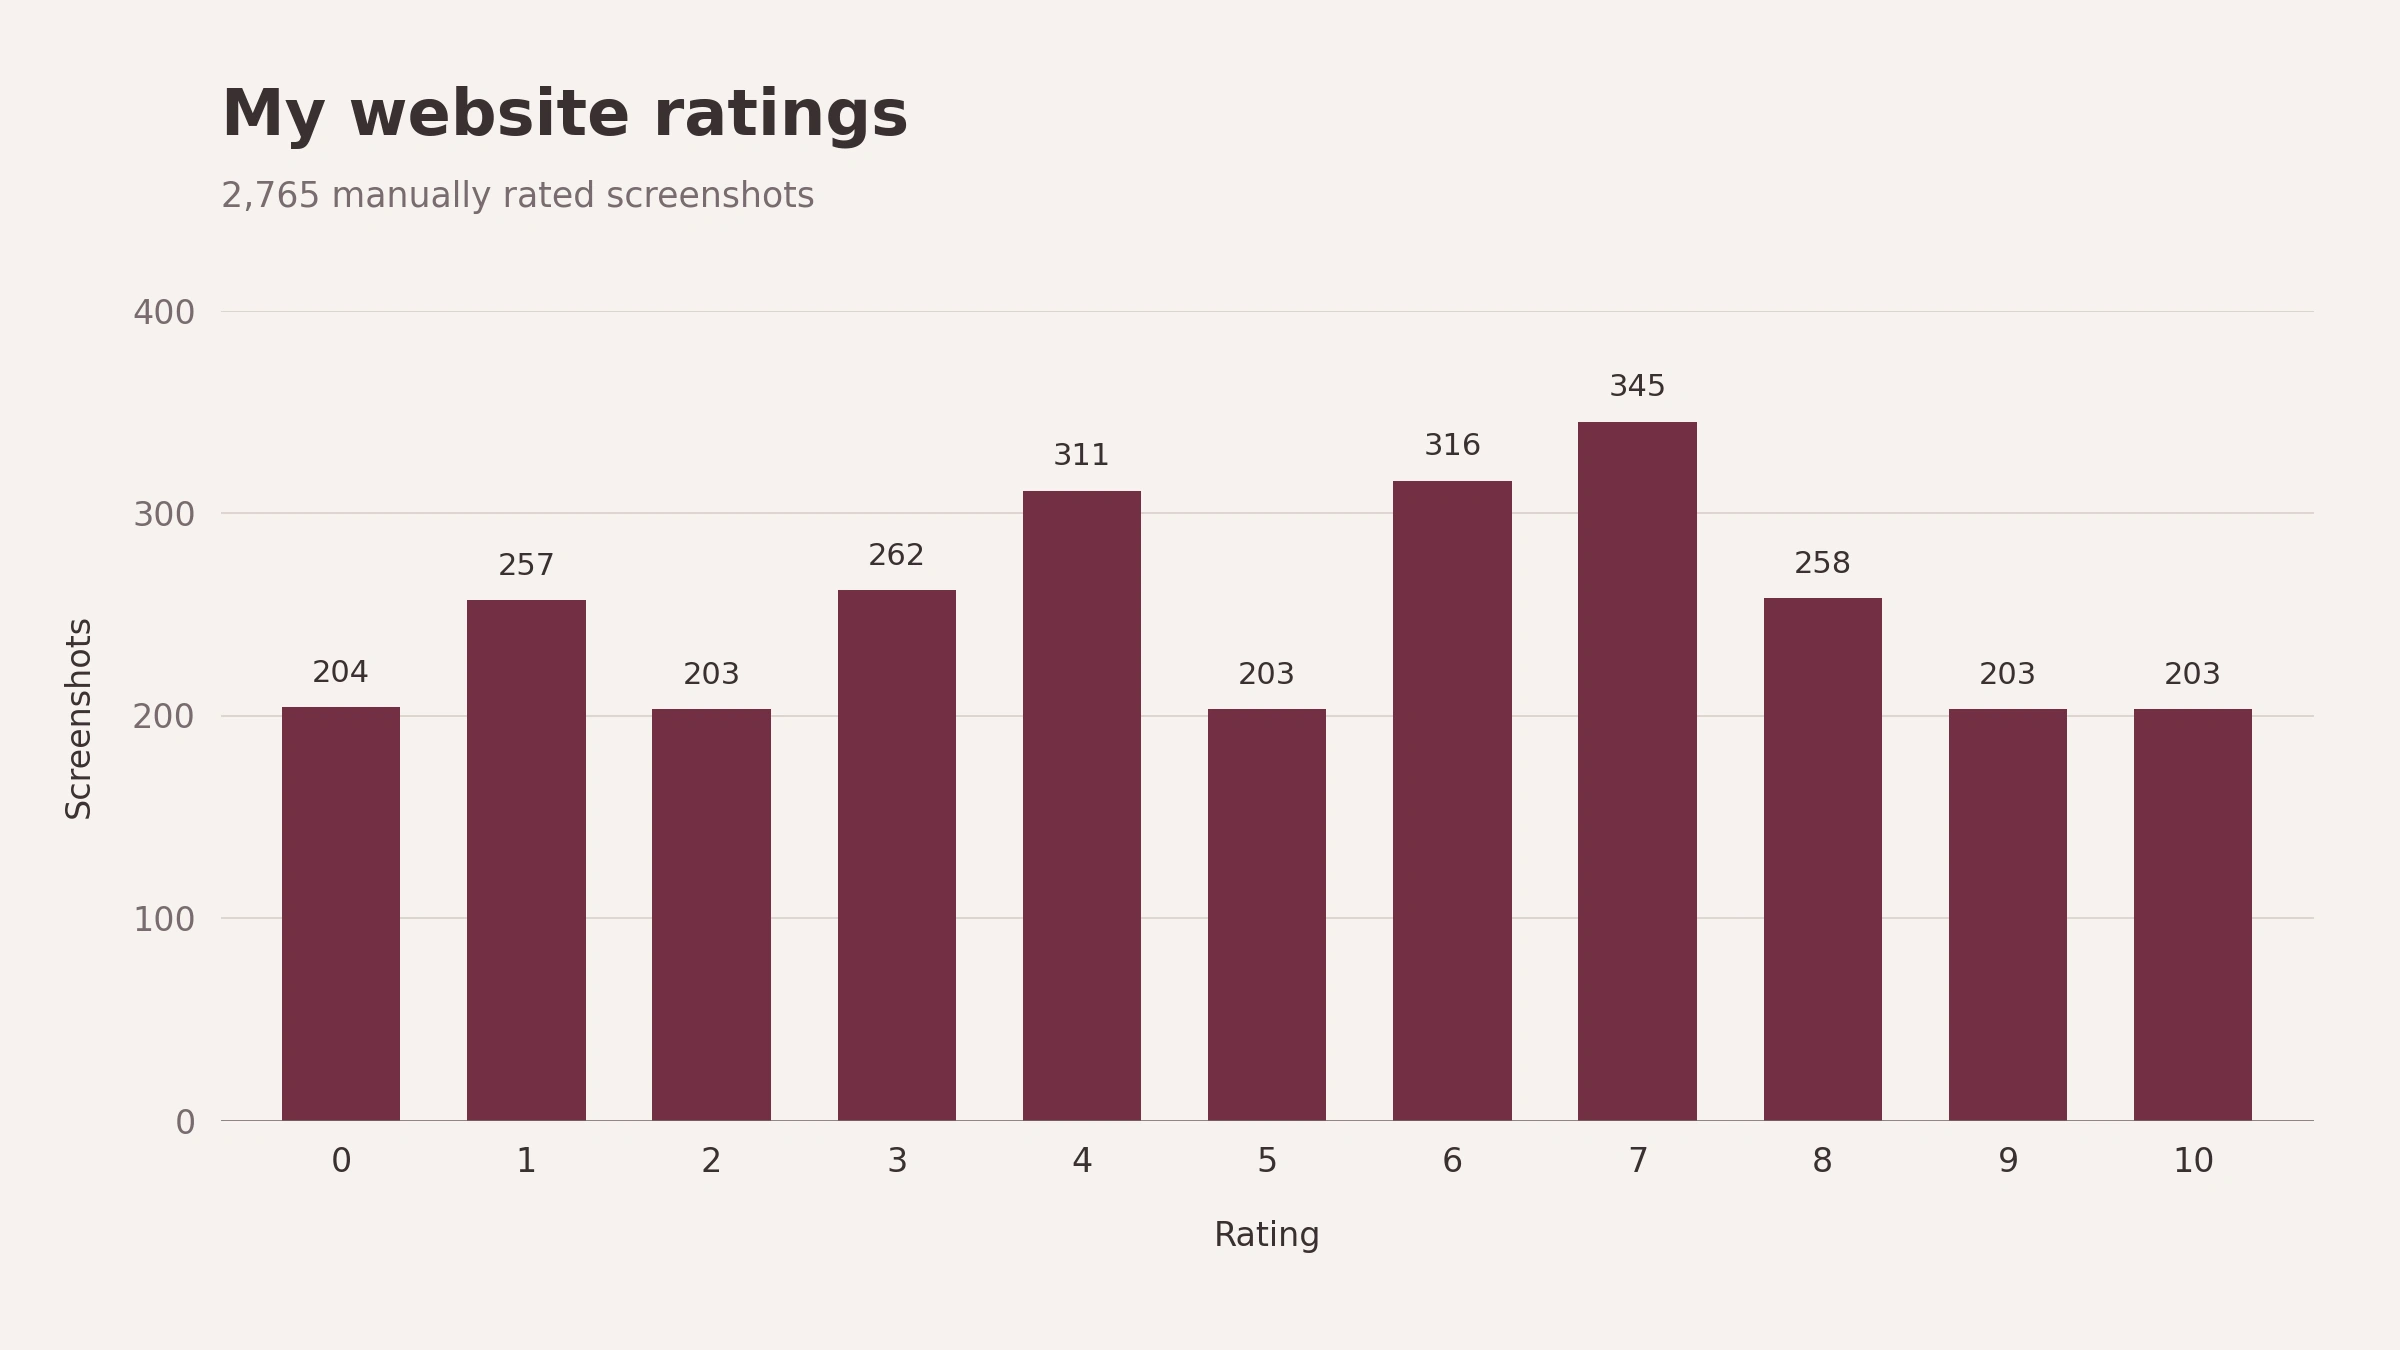
After rating about 300 images, I added predictions to the rating tool itself.
At first, I just wanted to see its guess next to the screenshot. Then I thought I could use it to help balance the dataset.
Suppose I have plenty of 7s, but barely any 8s.
The app checks how many ratings I have for each score and starts looking for a screenshot it thinks is an 8. Once it finds one, it shows me the image.
I look at it and decide it’s a 7.
Fine. The dataset gets another 7, and the app goes looking for another possible 8, assuming that’s still what I have the least of.
The model chooses the image. I still choose the rating.
I originally considered predicting the entire queue first, but there’s no need. Once it finds a candidate, it can stop. It also keeps the predictions it has already made, so those can be reused later.
There’s a feedback loop here, though. If the model is bad at recognizing something I’d give an 8, it might struggle to find those examples. And seeing its prediction could affect my own rating.
So the dataset is shaped by both my ratings and what the model decides to show me.
Did it actually learn anything?
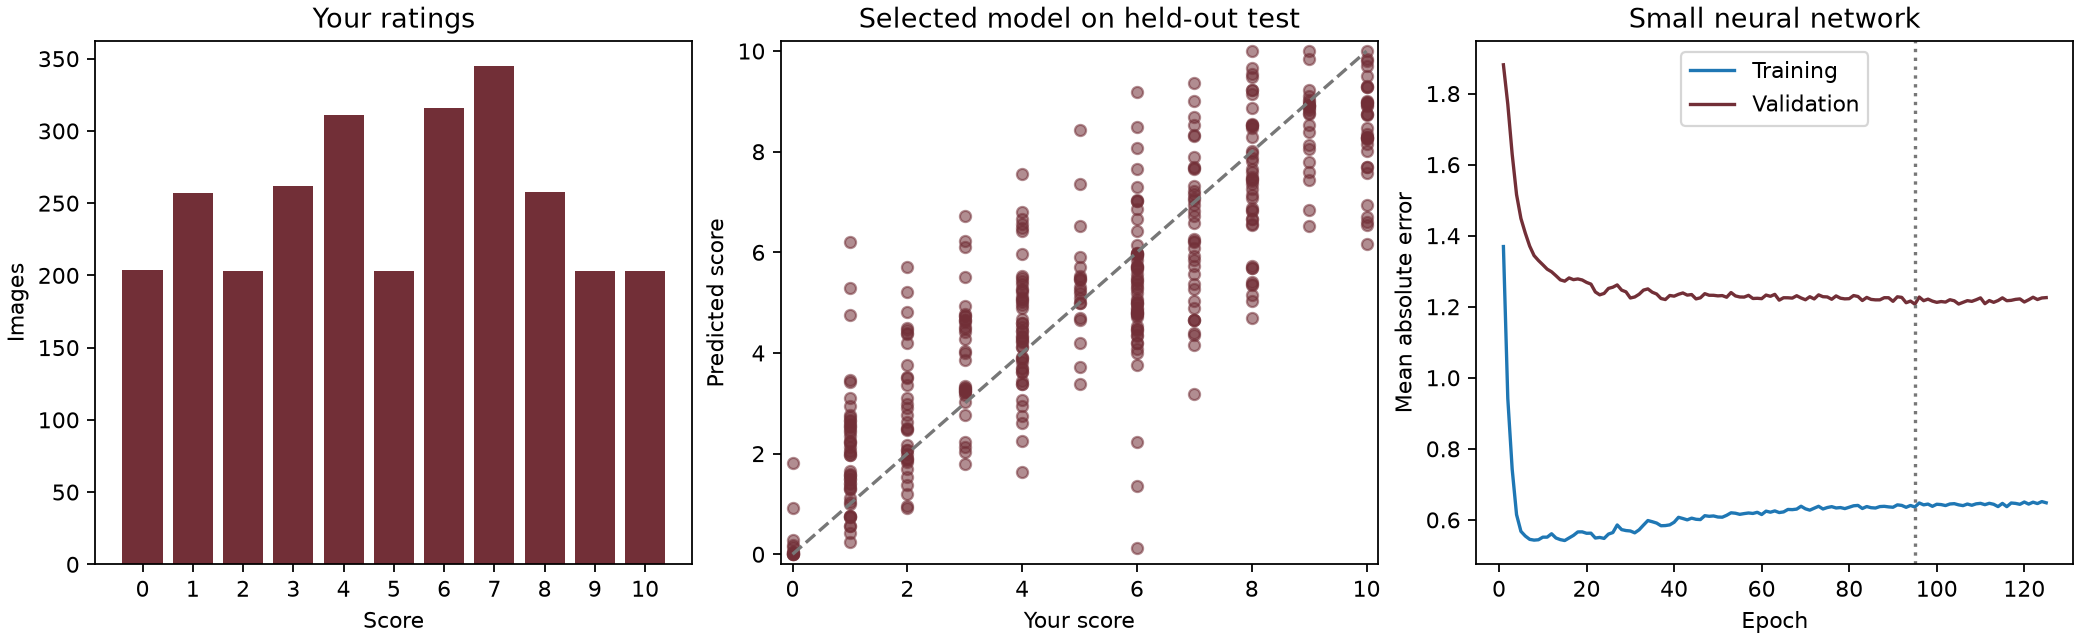
By the latest training run, the dataset had grown to 2,765 rated screenshots, with 2,588 distinct image hashes.
Some captures were identical, and some websites were related through their domains or redirects. Just splitting everything randomly could put very similar images into both training and testing, making the results look better than they really are.
The code groups those related examples together and keeps each group in one partition. This run had 2,508 groups, split like this:
| Partition | Screenshots |
|---|---|
| Training | 1,969 |
| Validation | 403 |
| Test | 393 |
The validation set picks the scoring model and its settings. The test set is evaluated afterward.
And Ridge ended up winning, slightly ahead of the small neural network.
Here’s how they did on the test set:
| Model | MAE ↓ | Spearman ↑ |
|---|---|---|
| Median baseline | 2.517 | — |
| Ridge regression | 1.137 | 0.857 |
| Small neural network | 1.179 | 0.856 |
Mean absolute error tells me how far the predictions are from my ratings, on average. So the selected model was off by about 1.14 points on a 0–10 scale.
Always guessing the median would be off by about 2.52 points. That’s roughly 55% less error with the trained model.
Pretty happy with that for a weekend project.
Spearman correlation checks whether it puts the images in roughly the same order I would. The score of 0.857 suggests it does that quite well, even when the exact numbers don’t match.
Taste is still a weird thing to label. Giving something a number doesn’t mean I’ll give it exactly the same number tomorrow, or even that I can explain why I picked it.
But by about 2,000 rated images, the tool’s guesses were lining up with mine pretty well. In those rating sessions, the images getting 10s were ones I’d give a 9 or 10, even before checking the prediction. A predicted 5 was generally somewhere around a 4–6 for me.
That was my impression from using it. These test results give me some numbers to go with it.
Putting it on my screen
I also made a small Windows overlay that shows the predicted score in the top-right corner, like an FPS counter.
It captures the screen, runs the prediction in the background, and updates the number. Pretty handy for trying it while browsing.
There’s a small catch: the training data contains webpage screenshots, while a screen capture can also include browser controls, the taskbar, or whatever other window I’ve left open.
Those things can affect the score, so I usually browse in full screen with F11 when using it.
Trying it yourself
The project is on GitHub.
It includes the capture script, rating tool, training code, prediction script, and Windows overlay.
After installing the dependencies, these commands use the model in weights/taste_model.joblib:
# Rate screenshots with model-assisted selection
python webtaste.py rate

# Predict a score for an image
python predict.py --input screenshot.png

# Run the Windows overlay
pythonw screen_taste.py
The default model reflects my ratings. If you want one that reflects yours, you’ll need to collect your own labels and train it.
You can start with plain manual rating:
python webtaste.py rate --no-model
Then use --model PATH to load your own model.
One last thing: collecting the dataset was quite taxing. I thought I could do it while watching something on the second screen, but I could barely follow what I was watching.
It weirdly enough required my whole attention to decide whether I liked a UI.
Ikr?! :))